OpenPoseとは?Qwen Image EditでAnyPoseモデルを使ったポーズ転写の完全ガイド
画像生成AIの世界では「ポーズを自由に制御したい」というニーズは非常に高いです。本記事では、OpenPoseの基本概念から、最新のQwen Image EditとAnyPoseモデルを組み合わせたポーズ転写の実装方法まで、サンプルコードとともに詳しく解説します。
📌 目次
- OpenPoseとは何か
- 使用するモデル一覧
- OpenPoseを「2枚目の画像」として使う仕組み
- 環境セットアップ
- 完全なサンプルコード
- プロンプトの解説
- パラメータ解説
- まとめ
1. OpenPoseとは何か
OpenPoseは、Carnegie Mellon大学が開発したオープンソースのリアルタイム人体姿勢推定ライブラリです。画像や動画から人物の骨格(キーポイント)をリアルタイムで検出し、身体の各部位(頭部・肩・肘・手首・腰・膝・足首など)の位置を特定します。
OpenPoseの主な特徴
- 25個のキーポイントを検出(顔・体・手・足)
- 複数人物の同時検出が可能
- リアルタイム処理に対応
- 画像生成AIのControlNetと組み合わせることで、生成画像のポーズを精密に制御できる
画像生成AIにおけるOpenPoseの役割
画像生成AIのワークフローでOpenPoseは主に以下の用途で使われます。
- 参照画像から骨格情報(スティックフィギュア)を抽出する
- その骨格情報をConditioningとして別のキャラクターに適用する
- 元のキャラクターの外見・スタイルを保ちながら、ポーズのみを変更する
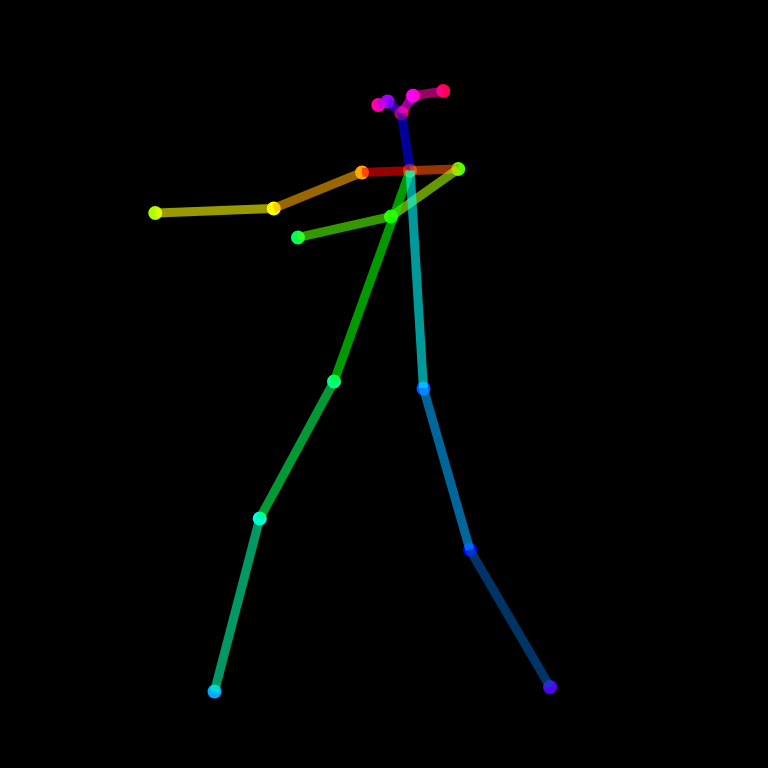
▲ OpenPoseが検出する骨格キーポイントのイメージ
2. 使用するモデル一覧
本記事で使用するモデルは以下の3つです。
| ファイル名 | 役割 |
|---|---|
Qwen-Image-Edit-2511-Lightning-4steps-V1.0-fp32.safetensors |
メインの画像編集モデル(Qwen Image Edit)。4ステップの高速推論に対応したFP32版 |
2511-AnyPose-base-000006250.safetensors |
AnyPoseのベースLoRAモデル。OpenPoseの骨格情報からポーズを理解・適用する基盤 |
2511-AnyPose-helper-00006000.safetensors |
AnyPoseのヘルパーLoRAモデル。ベースモデルを補助し、ポーズ転写の精度を向上させる |
AnyPoseモデルはLoRA(Low-Rank Adaptation)形式で提供されており、Qwen Image EditのベースモデルにLoRAとして追加適用することで動作します。
https://huggingface.co/lilylilith/AnyPose
3. OpenPoseを「2枚目の画像」として使う仕組み
本手法では、inputsの"image"キーにリストとして2枚の画像を渡します。
- image1(1枚目):ポーズを変えたいキャラクターの元画像(スタイル・背景を保持したい画像)
- openposeimage(2枚目):OpenPoseで抽出した骨格スティックフィギュア画像(目標ポーズを示す)
モデルはこの2枚の画像を受け取り、プロンプトの指示に従って「1枚目のキャラクターが2枚目のポーズをとった画像」を生成します。OpenPoseの骨格画像を参照とすることで、ControlNetに近い精度でポーズを制御できます。
OpenPose画像をそのまま渡すことで、ControlNetのような追加ツールなしにQwen Image Edit単体でポーズ制御が実現できます。これがAnyPose LoRAの核心的な機能です。
処理フロー図
元画像 (image1)          OpenPose骨格画像 (openposeimage)
   ↓                              ↓
   └──────────────────────────────┘
                 ↓
      [Qwen Image Edit + AnyPose LoRA]
                 ↓
   ✅ 元画像のスタイル・背景を保持しつつ
      2枚目のポーズを適用した新しい画像
4. 環境セットアップ
まず必要なライブラリをインストールします。
pip install diffusers transformers torch accelerate safetensors Pillow controlnet-aux5. 完全なサンプルコード
以下が全体の実装コードです。
import torch
import diffusers
from diffusers.utils import load_image
from PIL import Image

pipe = diffusers.QwenImageEditPlusPipeline.from_pretrained(
    "Qwen Imeg Editのモデル",
    torch_dtype=torch.bfloat16,
)


# LoRA1を読み込む(adapter_nameで名前をつける)
pipe.load_lora_weights(
    args.qwen_lora + "/Qwen-Image-Edit-2511-Lightning-4steps-V1.0-fp32.safetensors",
    adapter_name="lora_4step"
)

pipe.load_lora_weights(
    args.qwen_lora + "/2511-AnyPose-base-000006250.safetensors",
    adapter_name="repose1"
)

pipe.load_lora_weights(
    args.qwen_lora + "/2511-AnyPose-helper-00006000.safetensors",
    adapter_name="repose2"
)


pipe.set_adapters(["lora_4step", "repose1", "repose2"], adapter_weights=[0.9, 0.7, 0.7])

image1 = load_image("ボーズを変えたい画像").convert("RGB")
openposeimage = load_image("Open pose 画像").convert("RGB")

# ──────────────────────────────────────────────
# 4. 推論の実行
# ──────────────────────────────────────────────
inputs = {
    "image": [image1, openposeimage],
    "prompt": "Make the person in image 1 do the exact same pose of the person in image 2. Changing the style and background of the image of the person in image 1 is undesirable, so don't do it. The new pose should be pixel accurate to the pose we are trying to copy. The position of the arms and head and legs should be the same as the pose we are trying to copy. Change the field of view and angle to match exactly image 2. Head tilt and eye gaze pose should match the person in image 2. Remove the background of image 2, and replace it with the background of image 1.",
    "generator": torch.Generator().manual_seed(42),
    "true_cfg_scale": 0.0001,
    "num_inference_steps": 3,
    "width": 512,
    "height": 512,
}

output = pipe(**inputs)
result = output.images[0]
result.save("output_pose_transfer.png")
print("✅ ポーズ転写完了: output_pose_transfer.png")
6. プロンプトの解説
サンプルで使用しているプロンプトは精密に設計されています。各文の役割を解説します。
| プロンプト(英語) | 意味・役割 |
|---|---|
| Make the person in image 1 do the exact same pose of the person in image 2. | 画像1の人物に、画像2(OpenPose骨格)と同じポーズをとらせる基本指示 |
| Changing the style and background of the image of the person in image 1 is undesirable, so don’t do it. | 元画像のスタイル・背景の変更を明示的に禁止。キャラクターの見た目を保護する |
| The new pose should be pixel accurate to the pose we are trying to copy. | ピクセル精度でのポーズ再現を要求。関節位置の正確さを重視させる |
| The position of the arms and head and legs should be the same as the pose we are trying to copy. | 腕・頭・足の位置を個別に指定し、モデルがポーズのどの部位を優先すべきか明確化 |
| Change the field of view and angle to match exactly image 2. | 視野角・カメラアングルを画像2に合わせる指示(構図の整合性) |
| Head tilt and eye gaze pose should match the person in image 2. | 頭の傾き・視線の方向まで細かく合わせるよう指定 |
| Remove the background of image 2, and replace it with the background of image 1. | 画像2(OpenPose骨格)の背景を除去し、画像1の背景を維持するよう指示 |
7. パラメータ解説
| パラメータ | 値 | 説明 |
|---|---|---|
generator |
seed=42 | 再現性のために乱数シードを固定。異なる結果を試す場合は値を変更 |
true_cfg_scale |
0.0001 | CFGスケールを極めて低く設定。Lightning系モデルでは低CFGが推奨される |
num_inference_steps |
3 | 4-stepモデルのため3〜4ステップで十分。増やしても品質向上は限定的 |
width / height |
512 × 512 | 出力解像度。VRAMに余裕があれば768×768や1024×1024も試せる |
8. まとめ
本記事では以下の内容をカバーしました。
- ✅ OpenPoseの基本概念と画像生成AIにおける役割
- ✅ Qwen Image Edit(Lightning 4steps)のセットアップ方法
- ✅ AnyPose base / helper LoRAの読み込みと適用方法
- ✅ OpenPose骨格画像を2枚目の入力として使うことで実現するポーズ転写の仕組み
- ✅ 各プロンプト文とパラメータの詳細解説
AnyPose + Qwen Image Editの組み合わせは、ControlNetなどの追加インフラなしにポーズ制御を実現できる強力な手法です。OpenPose骨格画像を2枚目の参照として渡すという直感的なインターフェースで、高精度なポーズ転写が可能になっています。
ぜひ自分のキャラクター画像とポーズ参照画像で試してみてください!